
Assembling a bunk bed requires careful planning and attention to detail to ensure safety and stability. Following the instructions step-by-step guarantees a sturdy and secure setup for years to come.
Overview of Bunk Bed Assembly Instructions
Assembly instructions for bunk beds provide a detailed, step-by-step guide to constructing the bed safely and efficiently. These instructions typically include checking all parts, tools required, and safety precautions. The process usually starts with assembling the lower bunk, followed by the upper bunk, and attaching essential components like guardrails and ladders. Instructions emphasize securing the structure to ensure stability and compliance with safety standards. They also cover positioning the bed in a room, mattress size recommendations, and final inspections. By following these guidelines, users can build a durable and safe bunk bed, avoiding common assembly mistakes. Proper assembly ensures the bed meets safety standards and provides a secure sleeping environment for years to come.
Importance of Following the Instructions
Adhering to the bunk bed assembly instructions is crucial for ensuring the structure’s stability, safety, and durability. Proper assembly prevents injuries and guarantees compliance with safety standards. Following the guide helps avoid common mistakes that could lead to an unstable bed, potentially causing accidents. Instructions are designed to ensure all components are securely fastened, reducing the risk of collapse. Additionally, correct assembly prevents damage to the bed frame or mattress. By following the steps, users can ensure the bed meets safety specifications, such as guardrail height and mattress size requirements. Ignoring instructions may result in a hazardous environment, especially for children. Proper assembly also ensures the bed’s longevity and reliability. Always prioritize safety and precision by carefully following the provided instructions for a secure and sturdy bunk bed setup.

Preparation for Assembly
Begin by checking all parts, gathering tools, and organizing components. Ensure a clear, safe workspace and review instructions to avoid delays and ensure a smooth assembly process.
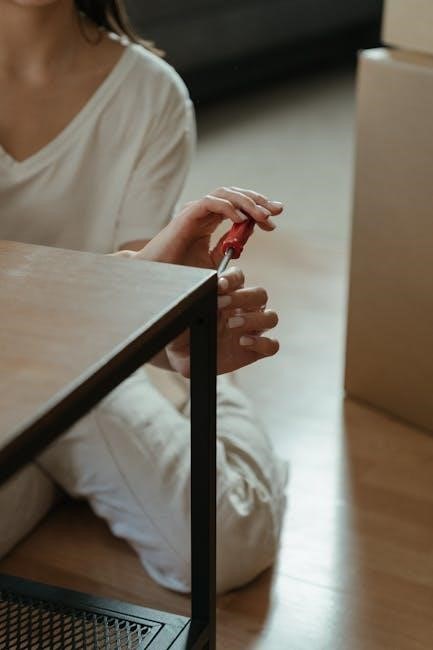
Checking the Parts and Components
Before starting assembly, carefully unpack and verify all components against the instruction manual. Ensure no parts are missing or damaged, as this could delay the process. Use the provided checklist to account for every item, including hardware like bolts, screws, and washers. Inspect each piece for visible defects or damage, as using compromised parts could compromise safety. Organize the components into logical groups, such as frame parts, hardware, and accessories, to avoid confusion during assembly. If any items are missing or damaged, contact the manufacturer immediately. Properly checking and organizing the parts ensures a smooth and efficient assembly process, reducing the risk of errors or safety hazards later on. This step is crucial for building a sturdy and reliable bunk bed.
Tools and Materials Required
To successfully assemble your bunk bed, gather the necessary tools and materials beforehand. Essential tools include an Allen wrench, screwdriver (both Phillips and flathead), a socket wrench or ratchet, and pliers for tightening bolts securely. Optional tools like a rubber mallet can help prevent damaging parts during assembly. Ensure you have all hardware provided, such as lag bolts, hex bolts, washers, cross dowels, and screws. Refer to the instruction manual for specific hardware requirements, as some beds may include additional components like split washers or locking nuts. Organize these materials in a accessible workspace to streamline the process. Having the right tools and materials on hand ensures a smooth assembly experience and prevents delays. Always double-check the manual for any special requirements unique to your bunk bed model.
Unpacking and Organizing the Parts
Start by carefully unpacking all components from their boxes to ensure no parts are missing or damaged. Lay out each item in a well-organized manner, grouping similar pieces together. Use the inventory list from the manual to verify the presence of every component, such as headboards, side rails, slats, bolts, and screws. Separate hardware like lag bolts, hex bolts, and washers into labeled containers for easy access. Place larger parts like frames and guardrails in designated areas of your workspace. Organizing the parts methodically prevents confusion and saves time during assembly. Double-check each piece against the provided diagrams to ensure correct identification. This step is crucial for a smooth and efficient assembly process, reducing the risk of delays or misplaced components. Proper organization ensures every part is within reach when needed.
Preparing the Workspace
Before starting assembly, clear a large, flat, and stable workspace free from obstacles. Cover the floor with a drop cloth or rug to protect it from scratches and debris. Ensure the area is well-lit to avoid shadows and improve visibility. Position all tools and parts within easy reach to streamline the process. Double-check that the floor is level to ensure the bunk bed assembles evenly. Remove any tripping hazards and keep children and pets away for safety. Lay out the instruction manual and any diagrams for quick reference. A clean and organized workspace reduces the risk of errors and makes assembly more efficient. Proper preparation ensures a smooth and stress-free experience, helping you complete the task safely and effectively.

Assembly Steps
Begin with the lower bunk, attaching side rails and headboards securely. Proceed to assemble the upper bunk, ensuring all connections are tight. Attach guardrails and the ladder, then connect both bunks firmly. Follow safety guidelines for a stable structure.
Assembling the Lower Bunk
Start by positioning the headboards (B) and side rails (C) in the desired location. Insert cross dowels (I) into the pre-drilled holes on the inside of the side rails. Attach the side rails to the headboards using washers (H) and lag bolts (G), ensuring they are securely tightened. Next, place the slats evenly between the side rails to support the mattress. Use a rubber mallet to tap components into place gently. Double-check all connections to ensure stability. Avoid over-tightening until all parts are in place. Work on a protective surface to prevent damage. Follow the manufacturer’s instructions for specific bolt torque values. Ensure the lower bunk is level and sturdy before proceeding to the upper bunk assembly. Always refer to the provided diagrams for clarity. Proper assembly of the lower bunk is critical for the overall safety and structural integrity of the bed. If unsure, consider enlisting a second person for assistance.
Assembling the Upper Bunk
Begin by assembling the upper bunk frame using the provided components. Attach the side rails and headboards together, ensuring all connections are secure. Insert the slats evenly across the upper frame to support the mattress. Use the hex keys and screws to tighten all bolts firmly, but avoid over-tightening until all parts are in place. Place the upper bunk onto the lower bunk’s support brackets, aligning the pre-drilled holes. Secure the upper bunk using the provided bolts and washers. Tighten all bolts evenly to maintain stability. Ensure the upper bunk is level and sturdy. Refer to the diagrams for correct alignment. Double-check that all screws are tightened properly for safety. If assembling near a wall, position the guardrail against the wall for added security. Ensure the mattress fits within the specified dimensions to meet safety standards. Proper assembly ensures a safe and durable upper bunk for years of use. Always follow the manufacturer’s guidelines.
Attaching the Guardrails
Attaching the guardrails is a critical step to ensure the safety of the upper bunk. Begin by positioning the guardrails along the edges of the upper bunk, aligning them with the pre-drilled holes. Secure the guardrails using the provided screws and washers, tightening them firmly to create a snug fit. Ensure the guardrails are evenly spaced and properly aligned to prevent gaps. For added stability, check the manufacturer’s instructions for specific recommendations on guardrail placement. If the bunk bed is placed near a wall, position the full-length guardrail against the wall to prevent access from the top bunk. Tighten all screws thoroughly to ensure the guardrails are secure and cannot shift. Properly installed guardrails help prevent falls and ensure compliance with safety standards. Always double-check the guardrails’ stability before allowing use of the bunk bed.
Securing the Ladder
Securing the ladder is essential for safe access to the upper bunk. Attach the ladder to the upper bunk frame using the provided bolts and washers, ensuring it is tightly fastened. Align the ladder’s brackets with the pre-drilled holes on the bunk frame and screw them into place. Tighten all screws firmly to prevent any wobbling or movement. Double-check the ladder’s stability by testing it with your weight. Ensure the ladder is positioned at a slight angle to prevent slipping and is securely attached to both the upper and lower bunks. For added safety, consult the manufacturer’s instructions for specific hardware requirements. Once secured, verify that the ladder is stable and even. Properly securing the ladder ensures safe and easy access to the upper bunk, reducing the risk of accidents. Always inspect the ladder before use to ensure it remains tightly fastened and functional.
Connecting the Upper and Lower Bunks
To connect the upper and lower bunks, align the upper bunk frame with the lower bunk frame, ensuring the pre-drilled holes match up. Attach the connector brackets or screws provided in the hardware kit to secure the two frames together. Tighten all bolts and screws firmly to ensure stability and prevent any movement. Double-check the alignment to ensure the bunks are level and evenly spaced. Once connected, test the structure by applying gentle pressure to verify its sturdiness. Make sure all bolts are fully tightened for maximum safety. This step is crucial for maintaining the structural integrity of the bunk bed and ensuring it can support the weight safely. Always refer to the manufacturer’s instructions for specific hardware and torque requirements. Proper connection ensures a stable and secure bunk bed for years of use.
Final Tightening of All Bolts and Screws
Once all components of the bunk bed are assembled, perform a final tightening of all bolts and screws to ensure maximum stability and safety. Start by reviewing each connection, such as the frame joints, ladder attachments, and guardrail fittings. Use a wrench or Allen key to tighten each bolt securely, but avoid over-tightening, which could damage the material. Double-check the upper and lower bunk connections, as well as the side rails, to ensure they are firmly secured. Refer to the instructions for specific torque requirements, especially for metal or wooden frames. After tightening, gently rock the bed to test its stability and verify that no parts feel loose. This step is critical for ensuring the bunk bed remains sturdy and safe for use. Always prioritize caution to prevent any structural weakness or potential hazards.

Safety Considerations
Ensure the bunk bed meets safety standards and weight limits. Prevent horseplay, prohibit jumping, and secure the ladder properly; Always use the ladder for accessing the upper bunk.
Safety Warnings and Precautions
Always follow the manufacturer’s instructions to ensure a safe assembly process. Prohibit children from playing under or on the bed, and never allow more than one person on the upper bunk. Use only the provided ladder for access, and ensure it is securely attached. Avoid jumping or horseplay, as this can destabilize the structure. Check the mattress dimensions to ensure it fits within the recommended size and thickness to prevent gaps. Secure the bunk bed to the wall to avoid tipping hazards, especially if placed near a wall. Keep the upper bunk out of reach of children under six years old due to fall risks. Regularly inspect bolts and screws for tightness to maintain stability. Adhering to these precautions ensures a safe and durable bunk bed for years of use.
Ensuring Stability and Structural Integrity
Ensuring the stability and structural integrity of your bunk bed is crucial for safety and durability. Begin by verifying that all parts are included and undamaged before assembly. Follow the manufacturer’s instructions precisely, as deviations can compromise the bed’s stability. Tighten all bolts and screws firmly, and double-check them after assembly. Place the bunk bed on a level floor to prevent unevenness, which can lead to wobbling or tipping. Use wall brackets or anti-tip brackets to secure the bed to the wall, especially for taller models. Avoid overloading the bed beyond the recommended weight capacity. Regularly inspect the frame, joints, and connections for any signs of wear or loosening. Addressing these issues promptly ensures the bunk bed remains stable and safe for years of use. A well-assembled bunk bed provides a secure sleeping environment for users of all ages.

Securing the Bunk Bed to the Wall
Securing the bunk bed to the wall is a critical step to prevent tipping and ensure safety, especially for the upper bunk. Most manufacturers provide wall brackets or anti-tip brackets with the bed. Attach these brackets to the bed frame and the wall according to the instructions. Ensure the wall anchors are firmly secured into studs for maximum stability. If your bed did not come with brackets, purchase compatible ones from a hardware store. Position the bed at least 4-5 inches away from the wall to allow proper ladder access while maintaining safety. Tighten all screws and bolts after installation. Regularly check the brackets and wall anchors for any signs of loosening or damage. This simple step significantly enhances the bed’s stability and reduces the risk of accidents, providing peace of mind for parents and users alike. Always follow the manufacturer’s guidelines for securing the bed to the wall.
Mattress Size and Thickness Requirements
Using the correct mattress size and thickness is essential for safety and proper fit on your bunk bed. The upper bunk typically requires a mattress with dimensions of 74-75 inches in length and 37.5-38.5 inches in width. The mattress thickness should not exceed 9 inches to ensure it fits securely within the guardrails. The mattress surface must be at least 5 inches below the top edge of the guardrails to prevent accidental falls. For the lower bunk, standard mattress sizes apply, but always check the manufacturer’s specifications for exact measurements. Using a mattress that is too large or too thick can compromise safety and stability. Always refer to your bunk bed’s assembly manual for precise requirements. Proper mattress sizing ensures a safe and comfortable sleeping environment for all users.

Additional Tips
Position the bunk bed away from windows and ensure it is securely anchored to the wall. Use protective pads on the floor to prevent scratching. Always follow safety guidelines for a stable setup.
Common Sense Tips for Assembly

Start by carefully unpacking and organizing all parts and hardware. Ensure you have all tools recommended in the manual, such as Allen wrenches and screwdrivers. Laying out components by category (e.g., bolts, screws, frames) helps maintain order and avoids missing pieces. Begin with the lower bunk to establish a stable base before moving on to the upper section. Always follow the sequence outlined in the instructions to prevent misalignment or structural issues. Use a rubber mallet instead of a hammer to avoid damaging parts. Double-check each step before moving forward to ensure all connections are secure. Consider enlisting a second person for tasks like lifting heavy sections or holding parts in place. Keep children away during assembly to maintain focus and safety. Protect your workspace with a drop cloth or old sheets to prevent damage from scratches or spills. Take breaks if needed to maintain focus and avoid mistakes. Refer back to the manual if unsure about any step. Final tightening should be done after the entire bed is assembled to ensure all parts are properly aligned. Test the bed’s stability by gently rocking it before use. Ensure all safety features, like guardrails and ladder securement, are correctly installed. Dispose of packaging responsibly to prevent hazards in the home. Store leftover hardware in a labeled container for future adjustments. Insist on using the correct mattress size as specified to maintain safety standards. Teach children the proper use of the ladder and bunk bed to prevent accidents. Regularly inspect the bed for loose bolts or wear and tear. Maintain a clean and tidy area around the bed to reduce tripping hazards. Consider anchoring the bed to the wall for added stability, especially in homes with young children. Keep the assembly manual in an accessible location for future reference. Take pride in your work and enjoy the satisfaction of building a safe and functional bunk bed for years of use.
Positioning the Bunk Bed in the Room
Positioning the bunk bed correctly is crucial for safety and functionality. Measure the room carefully to ensure the bed fits without obstructing doors or windows. Place the bed away from windows to prevent accidental falls. Avoid positioning the bed near heating vents or radiators to maintain even air circulation. Ensure the bed is at least 30 inches away from any wall to allow easy access and prevent entrapment. Choose a sturdy floor location to support the weight of the bed and occupants. Position the ladder on the side closest to the door for convenient access. Keep the area around the bed clear to prevent tripping hazards. Ensure the bed is level to maintain stability and prevent wobbling. Consider anchoring the bed to the wall for added stability, especially in homes with young children. Position guardrails on the side facing the wall if the bed is placed against one. Ensure the upper bunk is at a safe height to comply with safety standards. Keep the bed away from heavy furniture that could cause damage or create hazards. Ensure proper ventilation around the bed to promote a healthy sleeping environment. Position the bed in a way that allows natural light to illuminate the area. Consider the flow of the room to ensure the bed does not obstruct movement. Ensure the bed is accessible for regular maintenance and cleaning. Position the bed in a quiet corner to create a peaceful sleeping environment. Ensure the bed is not blocking electrical outlets or other essential fixtures. Position the bed in a way that allows for easy supervision of children. Ensure the bed is placed on a firm, even surface to prevent instability. Consider the aesthetic appeal of the bed’s placement in the room. Ensure the bed is positioned away from sharp objects or fragile items. Position the bed in a way that allows for future adjustments if needed. Ensure the bed is placed in a well-ventilated area to prevent moisture buildup. Consider the height of the ceiling to ensure the upper bunk is safe. Ensure the bed is positioned away from pets or other potential disturbances. Position the bed in a way that allows for easy exit in case of emergencies. Ensure the bed is placed on a clean, dry surface to prevent damage. Consider the long-term use of the bed when deciding its position. Ensure the bed is positioned away from direct sunlight to prevent fading. Position the bed in a way that allows for easy access to storage compartments. Ensure the bed is placed in a stable, non-slippery area to prevent accidents. Consider the preferences of the occupants when deciding the bed’s position. Ensure the bed is positioned away from drafts to maintain comfort. Position the bed in a way that allows for easy rearrangement of furniture. Ensure the bed is placed in a secure, tamper-proof location to prevent unauthorized adjustments. Consider the overall layout of the room when positioning the bed. Ensure the bed is positioned away from fragile items that could break. Position the bed in a way that allows for easy cleaning underneath and around it. Ensure the bed is placed in a well-lit area to enhance visibility. Consider the noise level in the room when positioning the bed. Ensure the bed is positioned away from electrical appliances to prevent interference. Position the bed in a way that allows for easy access to emergency exits. Ensure the bed is placed in a safe, secure location to prevent tipping. Consider the style and design of the room when positioning the bed. Ensure the bed is positioned away from hazardous materials or substances. Position the bed in a way that allows for easy supervision of the occupants. Ensure the bed is placed in a stable, level area to prevent wobbling. Consider the size and shape of the room when positioning the bed. Ensure the bed is positioned away from flammable materials or objects. Position the bed in a way that allows for easy access to bedding and linens. Ensure the bed is placed in a well-ventilated area to promote health. Consider the comfort and preferences of the users when positioning the bed. Ensure the bed is positioned away from sharp corners or edges. Position the bed in a way that allows for easy access to personal belongings. Ensure the bed is placed in a secure, stable location to prevent accidents. Consider the future needs of the household when positioning the bed. Ensure the bed is positioned away from heavy traffic areas to reduce disturbances. Position the bed in a way that allows for easy access to lighting controls. Ensure the bed is placed in a safe, secure environment for the occupants. Consider the overall functionality of the room when positioning the bed. Ensure the bed is positioned away from breakable items that could shatter. Position the bed in a way that allows for easy access to electrical outlets. Ensure the bed is placed in a stable, non-shifting area to prevent movement. Consider the layout of the room when deciding the bed’s position. Ensure the bed is positioned away from heating sources to prevent burns. Position the bed in a way that allows for easy access to the ladder. Ensure the bed is placed in a safe, secure location to prevent tipping. Consider the long-term durability of the bed when positioning it. Ensure the bed is positioned away from pets or other animals. Position the bed in a way that allows for easy access to storage areas. Ensure the bed is placed in a well-lit, safe environment for the occupants. Consider the preferences of all users when deciding the bed’s position. Ensure the bed is positioned away from hazardous areas to prevent accidents. Position the bed in a
Bedding and Mattress Recommendations
Choosing the right bedding and mattress is essential for comfort and safety. Ensure the mattress fits snugly within the bed frame to prevent gaps that could trap bedding or limbs; Use a mattress with the correct dimensions as specified in the assembly instructions to maintain structural integrity. Opt for a mattress thickness that does not exceed the maximum recommended height to ensure the guardrails provide adequate protection. Select a firm, supportive mattress to promote proper sleep posture and prevent sagging. Consider a mattress with a breathable cover to regulate temperature and prevent overheating. Use tightly fitted sheets to avoid bunching or slipping during sleep. Avoid bulky bedding that could interfere with the guardrails or ladder. Choose lightweight bedding for the upper bunk to reduce weight and ensure stability. Ensure the mattress surface is at least 5 inches below the guardrails to comply with safety standards. Regularly inspect the mattress and bedding for wear and tear to maintain a safe sleeping environment. Follow the manufacturer’s guidelines for bedding and mattress recommendations to ensure compliance with safety certifications like ASTM F-1427. Consider hypoallergenic bedding to accommodate sensitive skin or allergies. Keep bedding simple and functional to avoid clutter and potential hazards. Ensure bedding is easy to clean to maintain hygiene and freshness. Choose bedding that complements the room’s decor for a cohesive aesthetic. Regularly update bedding to keep up with changing seasons or preferences. Ensure bedding is securely in place to prevent it from shifting during sleep. Consider the preferences of the occupants when selecting bedding and mattresses. Ensure bedding and mattresses meet current safety standards to provide a secure sleeping environment.

Troubleshooting
Troubleshooting common issues during assembly, such as loose connections or misaligned parts, involves checking all components and following the manual. Ensure stability and adhere to safety standards to prevent hazards.
Common Issues During Assembly
Common issues during bunk bed assembly include missing or damaged parts, misaligned components, and loose connections. Ensure all hardware is tightened securely to maintain structural integrity. If parts are missing or damaged, contact the manufacturer for replacements. Misaligned components can be adjusted by checking the instructions and repositioning as needed. Loose connections may lead to instability, so double-check all bolts and screws. Additionally, ensure the workspace is clear to avoid accidental damage to parts. Following the step-by-step guide carefully minimizes errors. If unsure, consider seeking assistance or consulting online resources for clarification. Proper assembly ensures safety and durability, so take time to address any issues promptly. Always refer to the provided manual for specific solutions and precautions.
Resolving Missing or Damaged Parts
If you encounter missing or damaged parts during assembly, stop immediately and review the inventory list provided in the instructions. Double-check the packaging to ensure no components were overlooked. If items are indeed missing or damaged, contact the manufacturer or supplier promptly. Provide detailed information, such as the product model and order number, to expedite the replacement process. While waiting for replacement parts, organize the available components to avoid confusion. Avoid substituting missing parts with alternative materials, as this could compromise safety and structural integrity. Most manufacturers offer dedicated customer support for such issues, ensuring you can complete the assembly without delays. Always follow the manufacturer’s guidance for resolving part-related problems to guarantee a safe and successful assembly process.
Adjusting or Realigning Components

During assembly, if components such as side rails or guardrails do not align properly, carefully inspect the connections. Ensure all bolts and screws are loosely fitted before final tightening. Use a spirit level to verify that frames are even and plumb. If misalignment persists, gently adjust the parts without forcing them, as this could damage the material. If a piece is slightly warped or uneven, check if it can be corrected by tightening or loosening specific joints. Refer to the instructions for guidance on adjustable components. If issues remain, consider consulting the manufacturer’s support team for assistance. Proper alignment is crucial for stability and safety, so take the time to ensure all parts fit seamlessly together before completing the assembly.
After completing the assembly, conduct a final inspection to ensure all parts are securely tightened and aligned. Test the bed’s stability and verify that it meets safety standards before use.
Final Inspection and Safety Check
After completing the assembly, perform a thorough inspection to ensure all components are correctly installed and secure. Check that all bolts, screws, and connections are tightened properly. Verify the stability of the bunk bed by gently rocking it from side to side. Ensure the guardrails are firmly attached and the ladder is securely fastened. Confirm that the mattress fits within the recommended size and thickness specifications. Inspect the bed for any sharp edges or protruding parts that could pose a hazard. Double-check that the bed complies with safety standards, such as the ASTM F-1427 standard. Finally, test the bed by applying weight gradually to ensure it remains sturdy and stable. Address any issues immediately before allowing use.
Enjoying Your Newly Assembled Bunk Bed

Congratulations! Your bunk bed is now ready for use. Place the mattress according to the specified size and thickness requirements. Add bedding and pillows to create a comfortable sleeping environment. Ensure the ladder is positioned correctly for easy access to the upper bunk. Position the bed in a safe location, away from windows and heavy furniture; Teach children the rules for using the bunk bed safely, such as climbing carefully and avoiding horseplay. Regularly inspect the bed for any signs of wear or loose parts; By following these steps, you can enjoy your newly assembled bunk bed with peace of mind, knowing it is safe and sturdy for years to come.


Be the first to reply