DeWalt DW745 Table Saw Manual: A Comprehensive Guide
This manual provides detailed instructions for the DeWalt DW745 table saw‚ covering assembly‚ operation‚ maintenance‚ and troubleshooting. PDF versions of the manual and station plans are readily available online for convenient access.
The DeWalt DW745 is a portable table saw designed for both jobsite versatility and accurate home workshop use. This saw features a powerful motor and a robust construction‚ making it suitable for a wide range of cutting applications. Users can find comprehensive documentation‚ including the official manual in PDF format‚ online.
The manual details everything from initial setup and safety precautions to advanced cutting techniques. It also provides information on accessories‚ troubleshooting common issues‚ and maintaining optimal performance. Station plans are also available to enhance workspace organization.
Safety Precautions and Warnings
Prior to operating the DeWalt DW745‚ carefully review all safety precautions outlined in the manual. Always wear appropriate personal protective equipment‚ including safety glasses and hearing protection. Ensure the work area is well-lit and free of obstructions. Never remove safety guards or defeat interlock systems.
Disconnect the power before making adjustments or changing blades. Keep hands clear of the blade at all times. Be aware of kickback potential and use appropriate techniques to prevent it. Refer to the manual for detailed safety guidelines and warnings.
Unboxing and Component Identification
Upon receiving your DeWalt DW745‚ carefully inspect the carton for any damage during shipping. Once opened‚ verify all components are present‚ referencing the parts list in the manual. Key components include the table saw itself‚ legs‚ blade guard‚ miter gauge‚ rip fence‚ and various hardware.
Familiarize yourself with the location of the miter gauge slots (JJ) on the table top. Retain the manual for future reference‚ as it details each part and its function. Note that a portable stand is available separately.
Table Saw Specifications
The DeWalt DW745 boasts a robust design with specific dimensions and capabilities. Detailed specifications‚ outlined in the official PDF manual‚ cover crucial aspects of performance. These include precise measurements for dimensions and weight‚ essential for workspace planning.
Motor specifications define power and efficiency‚ while cutting capacity details the maximum material sizes manageable. Referencing these specifications ensures optimal and safe operation of the table saw for various woodworking projects.
Dimensions and Weight
The DeWalt DW745’s physical characteristics are vital for setup and portability. Precise dimensions allow for accurate workspace planning‚ ensuring sufficient room for operation and material handling. Weight considerations are crucial for transportation and stability during use.
The official manual provides exact measurements‚ enabling users to assess suitability for their workshop. Understanding these specifications aids in safe and efficient operation‚ preventing strain and maximizing control.
Motor Specifications
The DW745 is powered by a robust motor‚ delivering the necessary performance for various cutting tasks. Detailed motor specifications‚ found within the official manual‚ outline key parameters like horsepower and amperage. Understanding these values is crucial for selecting appropriate power sources and ensuring optimal operation.
Proper voltage and circuit protection are essential for motor longevity and safety. Referencing the manual’s motor details prevents damage and guarantees efficient performance during prolonged use.
Cutting Capacity
The DeWalt DW745 boasts impressive cutting capabilities for a portable table saw. Maximum cutting dimensions vary based on the type of cut – straight‚ miter‚ or bevel. Consult the manual for precise specifications regarding stock thickness and width for each configuration.

Understanding these limits ensures safe and accurate project execution. Exceeding the stated capacity can strain the motor and compromise cut quality. Always prioritize safety and adhere to the manufacturer’s guidelines.
Assembly Instructions
Carefully unpack all components and verify against the parts list in the manual. Begin by attaching the legs to the table saw base‚ ensuring secure and proper alignment. Refer to Figure 12 for bench mounting options‚ noting a portable stand is available separately.
Next‚ install the blade guard for enhanced safety during operation. Double-check all bolts and fasteners are tightened before powering on the saw. Proper assembly is crucial for stable and accurate performance.
Attaching the Legs
Begin leg attachment by aligning them with the designated mounting points on the table saw base. Securely fasten each leg using the provided bolts and washers‚ ensuring they are tightened evenly. Verify stability by gently rocking the saw after attaching all legs.
Proper leg installation is vital for a stable work platform; Consult the manual’s diagrams for correct orientation and bolt placement. A portable stand is an alternative‚ available from DeWalt dealers.
Installing the Blade Guard
The blade guard is a crucial safety component; install it before operating the saw. Align the guard with the mounting points above the blade‚ ensuring smooth movement. Securely attach using the provided hardware‚ verifying it doesn’t impede blade operation.
Always use the blade guard unless performing a specific cut where it interferes. Refer to the manual for proper adjustment and removal procedures. Prioritize safety by keeping the guard in place whenever possible.
Operating Instructions
Before operation‚ always inspect the saw for damage and ensure all safety features are functional. Confirm the blade is securely installed and the guard is properly positioned. Understand the controls – power switch‚ rip fence‚ and miter gauge – before starting any cut.
Always wear appropriate safety gear‚ including eye and ear protection. Never reach over or around the blade while it’s rotating. Follow the manual’s guidelines for safe and accurate cutting procedures.
Powering On and Off
To power on the DeWalt DW745‚ ensure the switch is in the “off” position before plugging it into a grounded outlet. Depress the power switch firmly to initiate operation; release to immediately stop the blade. Avoid abrupt shutdowns during a cut‚ allowing the blade to reach a complete stop naturally.
Always disconnect the power cord when changing blades‚ making adjustments‚ or performing maintenance. Never attempt to bypass safety features or force the switch. Regularly check the power cord for damage.
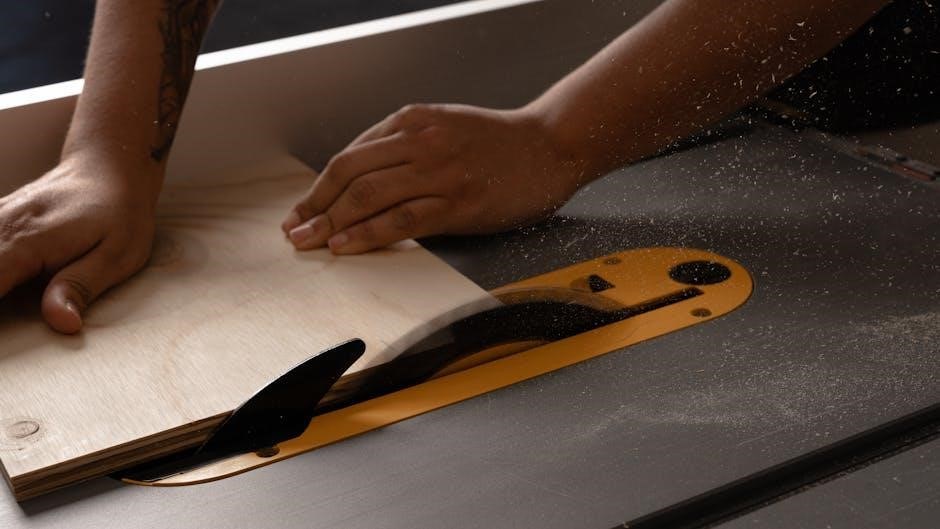
Making Straight Cuts
For straight cuts‚ adjust the rip fence to the desired width‚ ensuring it’s parallel to the blade. Securely clamp the workpiece against the fence‚ maintaining consistent pressure throughout the cut. Feed the material smoothly and evenly‚ avoiding hesitation or forcing the wood.
Always use a push stick when cutting narrow pieces to maintain safe hand positioning. Double-check fence alignment before each cut for accuracy. Inspect the cut for straightness and adjust as needed.
Miter Gauge Usage
The DW745’s miter gauge facilitates accurate crosscuts. Insert it into either miter gauge slot on the table top. Before operation‚ consult instructions for crosscutting and bevel crosscutting. Ensure the gauge slides smoothly and is securely locked at the desired angle.
Always maintain firm control of the gauge during use. Avoid applying excessive force. Regularly check for proper alignment and adjust as necessary for precise results. Never use the miter gauge with the rip fence simultaneously.
Inserting and Adjusting the Miter Gauge
To insert the miter gauge‚ align it with either of the two miter gauge slots located on the table top. Slide the gauge into the slot until it’s fully seated. For adjustments‚ loosen the locking knob and rotate the gauge to the desired angle. Ensure the angle is precise before tightening the knob securely.
Verify the gauge’s accuracy by testing a crosscut. Fine-tune the angle if needed. Regularly check the locking mechanism for tightness. Proper insertion and adjustment are crucial for accurate crosscutting operations.
Crosscutting with the Miter Gauge
Before crosscutting‚ ensure the miter gauge is securely locked at the desired angle. Place the workpiece firmly against the miter gauge‚ maintaining consistent pressure. Slowly feed the workpiece through the blade‚ keeping hands clear. Avoid forcing the cut; let the blade do the work.
For bevel crosscuts‚ adjust the table angle accordingly before operating. Always use caution and maintain a firm grip on the material. Inspect the cut for accuracy and make adjustments as needed. Safety is paramount during this process.
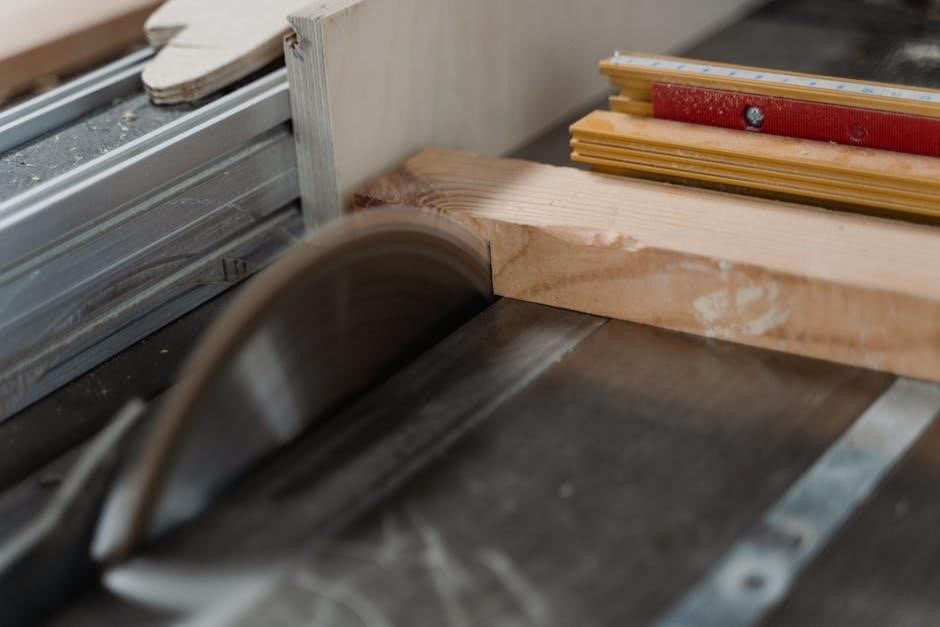
Rip Fence Operation
The rip fence ensures accurate‚ parallel cuts. Adjust it by loosening the locking mechanism‚ sliding it to the desired width‚ and securely re-tightening. Verify the fence is parallel to the blade before each cut. Use consistent pressure against the fence while feeding the material.
For precise results‚ double-check measurements and ensure the workpiece is firmly supported. Avoid applying sideways force‚ which can affect cut accuracy. Regularly inspect the fence for wear and proper alignment.
Adjusting and Locking the Rip Fence
To adjust the rip fence‚ loosen the cam lock lever. Slide the fence along the rails to the required measurement‚ utilizing the integrated scale for precision. Ensure the fence is square to the blade before tightening. Firmly engage the cam lock lever to secure the fence in position‚ preventing movement during operation.
Regularly check the lock’s tightness‚ as vibration can cause it to loosen. A properly locked rip fence is crucial for safe and accurate ripping cuts. Avoid over-tightening‚ which could damage the locking mechanism.
Using the Rip Fence for Accurate Cuts

Position your workpiece firmly against the rip fence‚ ensuring it remains in contact throughout the cut. Feed the material smoothly and consistently‚ maintaining even pressure. Avoid twisting or binding the wood‚ which can lead to inaccurate cuts or kickback. Always use appropriate safety gear‚ including eye and ear protection.
Double-check the fence alignment before each cut. A stable and accurately adjusted rip fence is essential for repeatable‚ precise ripping operations. Remember to never reach over a rotating blade.
Blade Changing Procedures
Disconnect the power cord before attempting any blade changes. Select the correct blade for your material‚ ensuring compatibility with the DW745’s arbor size. Use the provided wrenches to loosen and remove the blade nut. Carefully remove the old blade‚ noting its orientation.
Install the new blade‚ aligning it correctly. Secure the blade nut‚ tightening it firmly. Always verify the blade is properly installed and spins freely before reconnecting power.
Selecting the Correct Blade
Choosing the right blade is crucial for optimal performance and safety. Consider the material you’ll be cutting – wood‚ plywood‚ or non-ferrous metals require different blade tooth counts and designs. Higher tooth counts are ideal for fine cuts in hardwoods‚ while lower counts suit ripping lumber.
Ensure the blade’s arbor size matches the DW745’s specifications. Inspect blades for damage before use. Always wear safety glasses when handling blades.
Removing and Installing the Blade
Before blade changes‚ disconnect the saw from power. Use the provided wrench to loosen the arbor nut. Carefully remove the blade flange and old blade. Clean the arbor and flange surfaces.

Install the new blade‚ ensuring correct rotation direction. Replace the flange and tighten the arbor nut securely. Double-check tightness before operation. Always use the correct blade for the material being cut.
Bevel Cutting Guide
The DW745 allows for bevel cuts by adjusting the table angle. Locate the bevel adjustment knob and unlock it. Tilt the table to the desired angle‚ using a bevel gauge for accuracy. Securely lock the knob once the angle is set.
Always test the bevel cut on scrap material before cutting your workpiece. Ensure the blade guard is properly positioned for safety. Refer to the manual for specific angle markings and limitations.
Adjusting the Table Angle
To adjust the table angle for bevel cuts on the DW745‚ locate the bevel adjustment knob at the rear of the saw. Unlock this knob to release the table’s tilt mechanism. Carefully tilt the table to the desired angle‚ utilizing a bevel square or protractor for precision.
Once the correct angle is achieved‚ firmly re-lock the adjustment knob to secure the table. Double-check the setting before making any cuts. Refer to the manual for maximum bevel capacity.
Performing Bevel Cuts
With the table angle adjusted and locked‚ ensure the blade is appropriate for the material being cut. Feed the workpiece slowly and steadily into the blade‚ maintaining consistent pressure against the fence or miter gauge. Monitor the cut closely to ensure accuracy and prevent binding.
Always use proper safety gear‚ including eye and ear protection. Bevel cuts require extra caution; avoid reaching over or under the blade during operation. Refer to the manual for specific safety guidelines.
Troubleshooting Common Issues
If the saw doesn’t start‚ check the power cord‚ switch‚ and breaker. For blade wobbling‚ ensure the blade is securely tightened and the arbor is clean. Inspect for damaged bearings or a bent arbor shaft. Consult the manual for detailed diagnostic steps.
Always disconnect power before inspecting or repairing the saw. If issues persist‚ contact a qualified service technician. Ignoring problems can lead to further damage or safety hazards.
Saw Not Starting
If the DeWalt DW745 fails to power on‚ first verify the power cord is securely plugged into a working outlet. Next‚ check the circuit breaker or fuse box for tripped breakers or blown fuses. Inspect the on/off switch for any damage or obstructions. Ensure the safety lock is fully disengaged.
If these checks don’t resolve the issue‚ consult the detailed troubleshooting section within the DW745 manual for further diagnostic steps and potential solutions.
Blade Wobbling
Blade wobble during operation indicates a potential issue requiring immediate attention. First‚ ensure the blade is correctly installed and securely tightened with the appropriate wrench. Check for any debris or buildup on the arbor or blade mounting surfaces. Inspect the blade itself for damage‚ such as bent teeth or warping.
Refer to the DW745 manual for detailed instructions on blade inspection and replacement. Ignoring blade wobble can lead to inaccurate cuts and potential safety hazards.
Maintenance and Care
Regular maintenance is crucial for optimal performance and longevity of your DeWalt DW745. Frequently clean the table saw surface‚ removing sawdust and debris after each use to ensure smooth operation. Inspect the blade guard and other safety features for proper functionality. Lubricate key moving parts‚ as detailed in the DW745 manual‚ to reduce friction and wear.
Proper care extends the life of your tool and maintains cutting accuracy; Always disconnect the power before performing any maintenance tasks;
Cleaning the Table Saw
Consistent cleaning is vital for maintaining a functional and safe DeWalt DW745. After each use‚ disconnect the power supply before beginning. Remove sawdust and wood chips from the table surface using a brush‚ vacuum‚ or compressed air – avoid using water. Pay attention to the blade guard‚ miter gauge slots‚ and rip fence‚ ensuring they are free of debris.
Regularly wipe down the entire saw with a clean‚ dry cloth. This prevents buildup and ensures smooth operation.

Lubrication Points
Proper lubrication extends the life of your DeWalt DW745 table saw. Focus on the pivot points of the blade guard and the elevation mechanism. Apply a small amount of lithium-based grease to these areas periodically – typically every six months‚ or more frequently with heavy use.
The rip fence rails also benefit from occasional lubrication to ensure smooth gliding. Avoid over-lubricating‚ as this can attract dust and debris. Regularly inspect and wipe away excess lubricant.
DeWalt DW745 Table Saw Station Plans
Numerous station plans for the DW745 are available online‚ enhancing functionality and workspace. These plans often include designs for dust collection integration‚ outfeed support‚ and storage solutions. PDF versions‚ ranging from simple to complex‚ cater to various skill levels and shop sizes.
Consider plans offering miter saw integration or incorporating custom jigs. Resources like woodworking forums and online retailers provide access to these plans‚ often at minimal cost‚ improving your sawing experience.

Available Accessories
Enhance your DW745’s capabilities with readily available accessories. Blade options abound‚ catering to diverse materials like wood‚ metal‚ and plastics. Effective dust collection systems‚ including adapters and hoses‚ maintain a cleaner workspace and improve visibility.
Consider acquiring a portable table saw stand for increased mobility. Additional accessories include push sticks‚ featherboards‚ and specialized blades for dado cuts‚ maximizing precision and safety during operation.
Blade Options
Selecting the correct blade is crucial for optimal performance with the DW745. General purpose blades excel in all-around cutting‚ while rip blades maximize efficiency when cutting with the grain. Crosscut blades deliver clean‚ precise cuts across the wood fibers.
Specialty blades‚ such as those for plywood or non-ferrous metals‚ expand the saw’s versatility. Consider tooth count and blade material for specific applications‚ ensuring compatibility and safety.
Dust Collection Systems
Effective dust collection is vital for a clean and safe workspace when using the DW745. DeWalt offers compatible dust collection systems‚ including the DWV9000 universal dust extractor. Alternatively‚ shop vacuums with appropriate adapters can be utilized.
Connecting a dust port to the saw’s outlet minimizes airborne particles‚ improving visibility and respiratory health. Regularly emptying the collection container ensures optimal suction and prevents clogging‚ maintaining a productive workflow.
Warranty Information
DeWalt stands behind the DW745 table saw with a comprehensive warranty‚ typically covering manufacturing defects for a specified period. Registration of your purchase online is often required to activate the full warranty benefits. The warranty does not cover damage resulting from misuse‚ abuse‚ or normal wear and tear.
For detailed warranty terms and conditions‚ refer to the official DeWalt documentation included with the product or visit the DeWalt website. Contacting DeWalt customer support is recommended for any warranty claims or inquiries.


Be the first to reply